Thursday, December 26, 2013

Snowy Red Velvet

Been so crazily busy!!! Not able to really take a break since helper went home for holiday. I have friends who asked me, why did I let her go home for so long.... she will be gone for almost 3 weeks. How can I not agree when she said she hopes to spend New Year there? She only gets to see her children every 2 years (she is a single mom too), I have to let her stay longer. Honestly, I struggled on the first couple of days especially first day!!! I had a party at home on the day she left. You can imagine the amount of work I have to do that day and the next day, I was exhausted! Ahhaha but I did it!!! Kids helped too. I am so glad they are good kids. They behaved and looked after themselves well when I left them alone at home while I work. Proud of them. 

As much as I would like to just be lazy, sit back and relax, I do not want to miss out the Christmas cheers and fun!! A gathering on Christmas eve was a pretty last minute arrangement with few of my close friends. Nice cosy dinner ..... wonderful. All excited like a little girl waiting to go to playground to play with friends... hmmmm not so little anymore..... maybe minus 35 years??  Ahhahaha pardon me. Anyway, its an exciting plan for me so I decided to make a special dessert with Christmas touch. Have always been wanting to make Red Velvet cake but did not get to do it. Finally, my chance is here. A twist added to my dish. I found this cake recipe and turned out really well!! As for the cream cheese, I kind of just do it the way I like my cream cheese to be and this is the perfect frosting for the cake. :-)


Snowy Red Velvet
Adapted from “The Confetti Cakes Cookbook” by Elisa Strauss via the New York Times 2/14/07

1 tablespoon unsalted butter
3 1/2 cups cake flour
1/2 cup unsweetened cocoa (not Dutch process)
1 1/2 teaspoons salt
2 cup canola oil
2 1/4 cups granulated sugar
3 large eggs
6 tablespoons (3 ounces) red food coloring or 1 teaspoon red gel food coloring dissolved in 6 tablespoons of water
1 1/2 teaspoons vanilla
1 1/4 cup buttermilk
2 teaspoons baking soda
2 1/2 teaspoons white vinegar.
a bunch of chocolate chips for sprinkle

1. Preheat oven to 350 degrees. Place teaspoon of butter in each of 3 round 9-inch layer cake pans and place pans in oven for a few minutes until butter melts. Remove pans from oven, brush interior bottom and sides of each with butter and line bottoms with parchment.

2. Whisk cake flour, cocoa and salt in a bowl.

3. Place oil and sugar in bowl of an electric mixer and beat at medium speed until well-blended. Beat in eggs one at a time. With machine on low, very slowly add red food coloring. (Take care: it may splash.) Add vanilla. Add flour mixture alternately with buttermilk in two batches. Scrape down bowl and beat just long enough to combine.

4. Place baking soda in a small dish, stir in vinegar and add to batter with machine running. Beat for 10 seconds.

5. Divide batter among pans, place in oven and bake until a cake tester comes out clean, 40 to 45 minutes. Let cool in pans 20 minutes. Then remove from pans, flip layers over and peel off parchment. Cool completely before frosting.


Cream Cheese Frosting

227g cream cheese, room temperature
1/2 cup butter room temperature
2 cups confectioner's sugar, sifted

Place cream cheese and butter in a medium bowl. With a handheld electric mixer, beat until light and fluffy, about 2 minutes. Add sugar and vanilla.  Beat on low speed to combine. If too soft, chill until slightly stiff, about 10 minutes, before using.


6. Cut cake into small chunks. lay them on a rectangular dish. Pack them tightly. 


7. Spread the frosting on the chunks of cake.  Cover completely.

8. Sprinkle chocolate chips on the frosting.

9. I crushed left over cake crumbs all over the frosting.  

Job done!!  Enjoy :)


Note: If you want thicker frosting, double the ingredients.


Wednesday, December 4, 2013

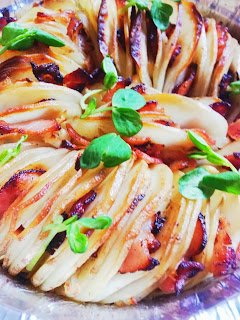
Wonderful Roasted Potatoes

The moment I saw this recipe I knew I must give it a shot.  Beautiful looking potatoes with bacon and butter.....its enough for me to give up my diet plan ahhaha Most important thing in this recipe is to slice the potatoes into very thin slice and I am glad I have pretty good slicing skill :p It is totally worth all the effort!!


Wonderful Roasted Potatoes

3 tbsp butter, melted
3 tbsp olive oil
10 russet potatoes, peeled and sliced thinly
1 small onion, peeled and sliced thinly
6 stripes of bacon, cut into small bite size
Salt and pepper to taste


1. Preheat oven to 180 degree C

2. Combine melted butter and olive oil in a small bowl.

3. Brush an oven proof dish with the butter mixture. (I use aluminum foil pan)

4. Arrange sliced potatoes vertically in the pan. Stuff sliced onion in between potatoes. Sprinkle with salt and pepper and brush the remaining butter and oil mixture.                

5. Bake for 1 hour and 25 mins uncovered. If potatoes become too dry,brush with more butter and oil mixture.  You may also use a butter knife to separate some of the slices if they stick together too much.

6. While baking the potatoes, brown bacon in a pan with some olive oil.

7. Remove potatoes from oven and stuff bacon all over the potatoes and bake for additional 30 minutes.  Remove from oven.

8. Serve immediately.  Sour cream will be a great accompaniment to the potatoes.


Serve this at party.  Will be great hit!!!

Refreshing Fruit Salad

Many years ago, I organised a gathering at home with friends. A friend made fruit salad for the pot luck gathering. I fell in love with this salad immediately!!! Must eat it when chilled. I gobbled down 4 bowls at one go!!!!! Gosh so delicious! I tried to make it myself and came up with my version of the fruit salad. Refreshing and light. Sometimes I eat it for lunch or just chilled it in fridge and eat as snack. So yummy, so simple to make.


Refreshing Fruit Salad

A bowl of grapes ( I love black grapes), washed and cut half
A can of mixed fruit cocktail, save 2 tbsp of juice from the can and discard the rest
1 red apple, peeled and cut into small bite size
1 small pack of peach yogurt
Juice of half a lemon                                                


1. Combine grapes, fruit cocktail, juice from cocktail can, apple, yogurt and lemon juice. Mixed well.

2. Chilled for at least an hour before serving.  

Enjoy!! :-)


Thursday, November 21, 2013

Honey Mustard Roasted Chicken with Vegetables

Just realise i have been away from the blog for quite awhile. Life has been hard and brutal. I am definitely glad I have strong heart to get me through though not quite through yet. I do not know when can i see sunshine again or when will everything be ok but I am not running away. I will face it and keep faith. 

What best I can do now to keep calm and sane is to be in the kitchen! To cook to bake for people I love. As usual, busy hectic life i have, meals have to be simple at most times but delicious. I once made this mustard chicken for kiddos and my friend, it didnt turned out to be great because did not marinate it enough. My mustard mixture was not rubbed into the chicken well enough though the crusted skin of the chicken was nice. Tried this dish couple of times with slight adjustment to my recipe, i got it right!!! Chicken was marinated way before cooking time and wow, the dish was beautifully great!!! 


Honey Mustard Roasted Chicken with Vegetables

1 whole chicken
4 tbsp Djon mustard
1 tbsp honey
2 tbsp thyme leaves
1 tbsp soy sauce
Juice of 1/2 lemon
4 tbsp olive oil
1 carrot, roughly chopped
5 Shitake mushrooms, wash and cut half if mushrooms are big
2 potatoes, roughly chopped
1 onion, roughly chopped
1 tbsp Basil
Salt and pepper to taste


1. Mix mustard, honey, thyme, soy sauce, lemon juice and 2 tbsp olive oil together.


2. Rub the mustard mixture all over and inside the chicken. Allow the chicken to marinate for at least 2 hours or more in the refrigerator. 


3. Set oven to 180 ℃ for 10 mins.


4. In a big bowl, mix all vegetables with basil, 2 tbsp olive oil, salt and pepper.


5. Remove mushrooms from the bowl for later use. Arrange the rest of the seasoned vegetables in an oven proof dish. Placed the marinated chicken on top of the vegetables.


6. Roast chicken and vegetables in oven for an hour or until cooked through. 


7. 40 mins into baking, add mushrooms into the the dish and return it to the oven. This is to prevent the mushrooms from over baking.


8. Once chicken is cooked, remove from oven. Cover it with aluminum foil and let it rest for 10 mins to retain the juice in the chicken.


Step 9. Prepare to start the feast with hot steamy rice!!!!


Note: There are 2 extra drumsticks because the kiddos love drumsticks. :p


Monday, November 4, 2013

Basic Walnut Brownies

Brownies!!!!  My all time favourite finger food.....Love the chewy chocolaty ones. The more nuts the better.  It is also a dessert that is so easy and fast to make.  Always a hit at home and among friends when I made it.  There is even a National Brownie Day in U.S., can you believe it??  They can actually set a day to celebrate food?? ahahahha That is absolutely interesting.  I like :)  Recently I baked some brownies to share with friends. This is the recipe I swear by.


Basic Walnut Brownies                         

150g butter, chopped
125g dark chocolate, chopped
3 eggs
1 1/2 cups caster sugar
1 tsp vanilla essence
1 cup plain flour
1/4 cocoa powder
1 1/2 cups chopped walnuts
icing sugar, to dust


1. Preheat oven to 180 degree Celsius. 

2. Brush a 20cm square cake tin with oil or butter. Line the base with baking paper extending over 2 sides.

3. Melt butter and the chocolate in a heatproof bowl over a pan of simmering water, stirring occasionally till mixture is smooth. Remove from heat and allow to cool slightly.

4. Beat eggs, sugar and vanilla in a large bowl until well combined. Sift the flour and cocoa together. 


5. Whisk the chocolate mixture into the egg mixture and stir in the sifted flour, cocoa and chopped walnuts till well combine.

6. Pour into the prepared tin. Bake for 40 minutes, until slightly risen and just firm to touch.

7. Leave to cool in the tin then lift out and cut into bite size. Dust with icing sugar to serve.


Note: Do not overbeat chocolate and egg mixture, just well combine. Use a spatula to fold in the flour, cocoa and walnuts.


They are gone before I know it!!! :)

Thursday, October 31, 2013

Fluffy Butter Cake

Butter cake.  Sound easy and a simple cake to bake BUT it is actually not.  To make it light and moist, that is tricky.  I tried long time ago and the cake came out to be ok but turned dry once it cool down.  Not tasty at all.  So I got online to search and search and finally found one recipe that tempted me to try it out.  This recipe by far is the best!!!  It is buttery, moist and fluffy!!!  I got the recipe from Kitchen Tigress and thanks to KT!!!  


Fluffy Butter Cake

180g salted butter, softened and cut iinto small pieces
30g caster sugar
45g egg yolks (from three 55g eggs)
3/4 tsp vanilla extract
150g self-raising flour, sifted
45ml full-fat fresh milk

105g egg whites (from three 55g eggs)
70g caster sugar


1. Preheat oven to 160 degree Celsius. Line bottom and sides of 15 x 15 x 5cm cake pan with parchment paper.

2. Cream butter and 30g sugar till pale and fluffy, scraping sides and bottom of the mixing bowl as necessary.Add egg yolks 1 at a time plus vanilla extract with the last yolk. Beat thoroughly after each addition till whisk leaves distinct trail.  Scrape down thoroughly.

Re-sift 1/4 of the sifted flour into butter mixture.  Fold with spatula till just even.  Re-sift another 1/4 into mixture.  Again, fold till just even.  Add milk in 2 batches, folding till fully absorbed after each addition.  Re-sift and fold the remaining half of the flour into mixture in 2 batches.

3. In a separate mixing bowl, whisk egg whites till thick. Continue whisking whilst gradually adding 70g sugar, till egg whites form stiff peaks.

4. Fold egg whites into flour mixture in 3 batches,scraping down as necessary to ensure even mixing.

5. Bang mixing bowl against worktop 2-3 times to remove air bubbles.

6. Scrape batter into cake pan. Spread evenly and smooth top. Bang cake pan against worktop 2-3 times to remove gaps between batter and pan.

7. Bake cake in bottom of oven for about 35 minutes till batter doesn't jiggle when shaken. Increase temperature to 180 degree Celsius. Continue baking for 10 minutes or so till inserted skewer comes out clean and cake is evenly brown.

8. Remove cake from oven. Leave on wire rack to cool. Cake may be remove from pan once dome has subsided and top has flattened.


Note:  Leftovers may be refrigerated, tightly wrapped.  Reheat in oven, wrapped in foil, till warmed through.


Never Give Up. I Can Do It!!!

It was a bad day for me yesterday. Everything not going my way.  I was on the verge of just want to hide myself in my room and not see anyone. Still I went through my day and even meet up a friend. Good time. There are times I just feel so down and ask myself why am I going through craps.... then I saw this on net last night.....


The moment I read these words, I feel so much better.  Strange how words can boost someone's feelings.  Today I am all fresh and ready to face the world all over again!!!!


Hello and Good morning!!! :)


Friday, October 25, 2013

Aglio Olio with Grilled Chicken

Aglio Olio is a traditional Italian pasta dish.  It means garlic and oil and is made by sauteeing minced garlic and tossing with spaghetti, sometimes dried chilli flakes added to it.  Garnish with finely chopped parsley and sometimes with parmesan cheese.  When I cook Aglio Olio, I will not add chilli flakes because kiddos do not eat.  I will also add in other ingredients so the simple dish is more interesting to the kiddos.  Forget about going through cook books or magazines recipes for the authentic recipe, I came out with my version, the one my family like.


Aglio Olio with Grilled Chicken                       


a tray of boneless chicken chop
1 tbsp garlic salt (buy from grocery store)
1 tsp dried Rosemary leaves
350g Penne pasta, cook according to instruction on package (save a bowl of pasta water)
2 cloves garlic,minced
Capsicum (I used 2 diferent colours, 1/2 each)
5 Shitake Mushrooms
salt and pepper to taste
1/3 cup of parmesan cheese
1 tbsp chopped parsley
Olive oil for frying


1. Marinate chicken with garlic salt, Rosemary and set aside for at least an hour or more.

2. Heat a grill pan brushed with some oil, place chicken skin down for about 8-10 mins then turn over and grill for another 8-10 mins or until cooked.  Set aside for about 10 mins chicken once cooked.

3. Cut chicken into small bite size.

4. In a pan, heat olive oil and saute garlic. Add mushrooms and grilled chicken to pan, fry for about 1 minute.

5. Stir in cooked Penne, fry in medium heat for about 2 minutes.  Add 1 tbsp of reserved pasta water if Penne mixture is too dry.

6. Add capsicum, salt and pepper and fry for another 1 minute.

7. Turn heat off and stir in parmesan cheese and chopped parsley mix well.


Note: Cook Penne just before you fry garlic. To cook good pasta, add plenty of salt and keep water boiling throughout cooking time. Do not cover and stir from time to time. Pasta should be cooked 'al dente' that means just slightly chewy.  Once pasta is cooked, strain immediately without draining off all the cooking water.  Season and serve while hot.

Bon Appetit!!!


Monday, October 21, 2013

Crispy Okra

I am back!!!!  Been away from blog for couple of weeks.  So busy with so much things going on in my life.  Glad to be finally able to sit down and write again.  Challenging life lately. meals at home is a little upside down. Still, I try to cook almost everyday.  To have to come up with dishes for kids is not easy.....I am talking about dishes they like. Sometimes I do not know what exactly they want.  I can cook a new dish today and they said they love it because it is sooooo yummilicious then the next round when I cook it again, they ask, no new dish????  Hey kids, I am not a stay home mom and have all the time to invent new dishes all the time!!! 

I love vegetables, to get them eat all sorts of vegetables is like going through storm when they were younger.  Still I am proud to say I succeeded in this because I made them eat even if they do not like.  My mom called me 'Stepmom'.  Once to make Justin eat Chye Sim, I minced the whole bunch of Chye Sim and dump into the rice cooker with some butter.  At dinner, you can imagine Justin's horror look when he saw that his rice that night was GREEEN!!!!...... I controlled myself not to laugh but he looked so funny.  Now my kiddos eat quite a good range of vegetables.  Xiao Bai Cai,Chye Sim, Kai Lan, Lettuce, long beans, potatoes, Spinach and KangKong (their favourite). Not too bad I thought.  

My next aim is to get them eat assorted vegetables, one of the biggest challenge is Lady's Fingers aka Okra.  Slimy texture is a no-no for them.  I thought for long time and I came out with this recipe.  Simple and no hassle.  I tried and it was a hit!!! Though might not be the most ideal way to introduce healthy vegetables but at least they know that vegetables can be eaten in interesting ways.  Here is the recipe I learnt few years back from an indian friend. Dont quite remember the complete one but I just go with the flow with my own touch.  As long as kiddos eat, all is well!!!


Crispy Okra                                                      

A bunch of Okra (about 2 cups) - Wash and dry each Okra then cut into bite size       
1 tsp light soy sauce
1/4 tsp salt
1 tbsp corn flour


1. Marinate Okra with turmeric, soy sauce and salt.

2. Let it stand for about 20mins

3. Heat up oil in a wok for deep frying.  Stir in corn flour just before frying the Okra.

4. Once oil is hot, add Okra into oil in batches so they wont overcrowd the wok. It will leaves space for the greenies to crisp up.

5. Fry for a few minutes till they are crispy.  Scope them out from the wok and drain off excess oil and let them cool.

6. Continue with second batch and repeat same steps.

7.  Serve with rice and other dishes.


Note:  You might want to wear a glove or have a plastic bag on your hand or just use a fork to mix the turmeric with Okra unless you dont mind yellow hands that will stay with you for awhile.

Thursday, October 3, 2013

Easy Grilled Salmon

Have been very busy with daily life.  Honestly I have no idea why I do not have much time for many things.  I find myself drained by night time.  Errands to run, things to manage at home, my work (crazy schedule, my organizer is looking like a typhoon had swipe passed) then kids to manage (this take up most part of my time)!!!  I try my very best to keep a balance at home making sure everyone is happy and well taken care of.  I do not know about other single mothers but I just know I actually freak out if I know kids are upset with some issues in their own life.  I will put on my Wonder Woman armor and do all I can for them to keep them happy or help them with their issues which means if this happen, there goes my personal time!!!  I realise as they grow older, they have more issues...... it will be wonderful if they remain as toddlers and I am in my dreamland fantasizing again.  It is good to day dream sometimes...... it brings me into another world and you will find me smiling to myself ahahhaha.  I feel that I have double responsibility to the family as I am alone and I think sometimes I might have overload my plate.  

I know Lotte loves Salmon, she has not been very well.  I want to cheer her up so I whipped up this simple satisfying meal for her.


Easy Grilled Salmon

300-400g of fresh Salmon fillet with skin on, cut into half thick strip (makes 2 pieces)
2 tbsp japanese soy sauce
1 tbsp Dijon mustard
1/2 tsp dried dill (use fresh ones if have)
dash of black pepper
Olive oil for grill pan and salmon


1. Whisk soy sauce, mustard, dill and black pepper together.  Drizzle over salmon fillets and let it sit for about 15 mins.

2. Heat grilled pan and wipe the pan with some olive oil. 

3. Once pan is hot, brush salmon with some olive oil and place Salmon skin side down on the grill. Grill undisturbed for 3 to 4 minutes, depending on the thickness of the fish.  Turn carefully with a spatula and grill other 3 sides for about another 1 to 2 minutes each side. If your salmon is not as thick as mine, you just need to grill on the skin side and bottom for 3 to 4 minutes each. 


Note: Pat dry the salmon before you marinate. I also like to pat dry the marinated salmon before grilling the salmon.  Skin side must be down first so that less chance of salmon falling apart when flipping.


I served the salmon with olive rice and Sunny-side up (with runny yolk, Lotte's favourite)

Our dinner is done with in 1/2 hour!!!!  Yipee!!!


Thursday, September 26, 2013

Pork Fragrance Rice

One of the magic one-pot dish that is so common at our home is this Fragrance Rice.  We can have it once a week at times.  I can cook this with eyes close.....ehhhh kidding.  I mean I know this recipe inside out.  Have been very busy with alot of things that have been happening in my life and with people around me.  Kind of overwhelmed and there were few days I felt pulled down. Some days my brain is in repair...... under reconstruction and I totally cannot function.  Charlotte is still not well so have to keep menu simple at home.  I was sitting at dining table thinking about dinner and suddenly the 'light bulb' in my head lighted up and I was excited and telling all at home, "Hey guys, you know what?  I will be cooking Fragrance Rice tonight!!!!" with a big smile on my face.......background, ................... Yes silence..... as if anyone bothers.  I think they were reacting correctly.  We have this so often what's so exciting about?? ahahhaha ok let's get back to the cooking part.  Ok here it goes.


Fragrance's Rice

a tray of pork shoulder, sliced thinly
2 shallots, sliced thinly
a bunch of dried shrimp, minced
1 chinese sausage, sliced
5 chinese mushrooms, soaked and sliced
1 small cabbage, cut into small pieces
2 tbsp fish sauce
1 tbsp light soy sauce
1 tbsp sesame oil
a dash of pepper
1 tbsp corn flour
2 tbsp water
2 tbsp oil
2 cups rice,washed
1 cup water
1 tsp salt


1. In a bowl, mix pork with fish sauce, light soy sauce, sesame oil, pepper, corn flour and water.
Marinate the pork for at least an hour or more.


2. In a wok, heat oil then add dried shrimps and shallots, fry till fragrance.  Add pork and fry for 3 mins.

3. Once pork turn brown, add mushrooms and sausage and fry for another 2 mins in high heat. 

4. In rice cooker, mix rice, water and salt. Top it with cabbage then the
 cooked pork mixture.

5. Turn the cooker on and let it cook.  Serve hot.


Note:  Cut the amount of water for rice by at least half.  The reason is cabbage will gives out alot of moisture when cooked. If you cook rice the usual way, the rice will eventually become soggy. 

Enjoy enjoy this fast and easy recipe.  For you on your busy busy day.


Sunday, September 22, 2013

Porridge in Mushroom Stock & Steamed Sesame Chicken

I think the most stressful part as a mother is when children fall sick. Lotte is having 
fever and I feel like screaming out loud!!!!! Justin and I just recovered from our cough and now its Lotte's turn!!! Never ending musical chair. I hate musical chair game since I have children. It is exact feeling when it rains after I got the car washed and had it polished!!!!! Arghhhhh........ i am cursing and swearing really. 

Alright, get things straight Adriana. No point pulling hair......only cause more hair fall. Do what l have to do as a mom. Nurse my baby!!!! Before I can do anything, my helper, Lin told me she is sick as well. Worse nightmare ever.....it is not even Halloween!!!!! What luck. Now I have two to nurse. 

The moment i am done with my lessons, i started boiling stock. Cannot decide on what stock for the porridge at dinner..... chicken, pork or just vegetable stock??? Oh boy..... i found some Shitake stems.....big bag !!!! Decided to make mushroom chicken stock. I am a mushroom fanatic. Love love mushrooms, any type!! I am also making pumpkin and broccoli porridge for kiddos. Yucks???? If any kids are reading this, or mommies, tell kids don't freak!!!! My Justin slurp slurp away during dinner. Trust me, the porridge is thumbs up!!!!!


Mushroom Chicken Stock                        

20 mushroom stems
Some chicken bone ( I kept the neck, feet and bone from previous chicken dish i made and freeze them)
a small bunch of Wolfberries, soaked
2 carrots, roughly chopped
a small bunch of ikan billis, washed and drained
about 2L of water or slightly more (depending on how much ingredients you add)

1. Put all ingredients into a pot and boil.once boiled, reduce heat and let it simmer for about an hour or more.


Note: There is no rules to making stocks. You do it the way you want and how you want. Just remember, do not let it boil till bubble. Once boiled, let it simmer. Boil under low heat. The flavor is much better.


Pumpkin Broccoli Porridge             


1/4 pumpkin (shredded)
1 small broccoli (shredded)
2 tbsp shallot oil ( optional)
1 cup rice, washed
1L stock

1. Put all ingredients into a pot and boil (I used the stock I made).

2. Once boiled, reduce to simmer and stir occasionally to prevent rice sticking to bottom of the pot.

3. Once rice turn soft, off fire and covered. Let it sit for 15 mins and porridge is ready.


Note: There is no rules to cooking porridge as well. This measurement of liquid for our porridge is how we like it at home. You can adjust to the texture and way you like.


This porridge is so flavoured and best for sick family members because it has so much goodness in it.

At the same time I steamed some chicken to go with our porridge.  As much as I love vegetables, I cannot imagine how to have dinner without some meat :P


Steamed Sesame Chicken                                  

1 small chicken, chopped into bite size
1 tbsp ginger, sliced thinly
2 tbsp sesame oil
2 tbsp chinese cooking wine
1 tbsp oyster sauce
1 tbsp light soy sauce


1. Mixed all ingredients together with chicken and let it marinate till you are ready to steam. At least an hour or more.

2. Arrange chicken on a plate. In a wok boiled water for steaming, place a metal rack in it. Once water boiled, place the plate of chicken on the rack. Covered and steam for 15-20 mins. To check for doneness, inset a chopstick into the thickest piece of chicken. If it goes through smoothly then chicken is cooked.

3. Serve hot with porridge or rice.


Note: I sometimes use rice cooker to steam chicken because its fast and no hassle. 

Kiddos love the chicken gravy on the vegetable porridge. And it sure does not taste or look terrible with the broccoli in the porridge :p 

Testimony from Justin, 'Mom, this is the best porridge ever!!!'


Thursday, September 19, 2013

Braised Rock Sugar Pork

Rock sugar aka Rock candy aka Bing Tang is originally from Iran!!! Hmm am I ignorant or its just a fact that generally people do not know??  Well at least I learnt something recently.  

Yummmm is the word to me in anything with rock sugar. I remember I will sneak to the cupboard in kitchen when I was young to 'steal' one or two rock sugar and pop them into my mouth.....Mmmm Mmmm yummm..... Love them in dessert, drinks, even food like meat dishes.  One of my favourites is this Rock sugar pork ribs.  

Confidently thought I have some ribs stocked away in my freezer but could not find any except for pork shoulder butt. Oh well, this is me, sometimes a sotong.  Since I dont have ribs, I thought I will just make do with the butt....yes love the butt as well :P No oil is needed in this recipe. Healthy and simply delicious.


Braised Rock Sugar Pork

Pork Shoulder Butt ( I bought $5 of it from the wet market and stored it in freezer)
1 tsp five spice powder
1 tbsp sesame oil
1 tbsp light soy sauce
1 tsp dark soy sauce
dash of pepper
1/2 cup water
bunch of rock sugar (depend on how sweet and thick you like)


1. Cut shoulder butt into small bite size.

2. In a big bowl, add five spice, sesame oil, light soy sauce, and pepper.  Covered and marinate for an hour or overnight.

3. Heat the wok and brown pork.  Add dark sauce, water and rock sugar.

4. Once gravy is boiled, let it simmer and braise the pork for about 15 mins or till gravy is thicken.

5. Serve hot with garlic sprinkle (optional) d rice.

NOTE : If i am using pork ribs, i will just marinate it with a slice of crushed pineapple (the pineapple marinated pork ribs will be super tender) for least an hour and go straight to step 3.  

It is a must try dish if you have children.  My kids LOVE LOVE LOVE the gravy on rice.  One plate of rice is never enough with this dish.

Sunday, September 15, 2013

Steamed Chicken Rice in Rice Cooker!!

Friends always ask me if I let helper cook.... oh yes of course...... i gave her the freedom. The catch is, her menu will be same from Monday to Friday if I let her prepare lunch. This is how her lunch menu will look like.....
Monday: Dry Mee Pok.
Tuesday: Dry instant noodle.
Wednesday: Dry Yellow noodle.
Thursday: Dry Mee kia (thin noodle).
Friday: Dry noodle whichever she can find at home.
So, I do not let her cook dinner if possible. My gosh, i do not want fried rice every night!!! I am not complaining, I love cooking and I have no issue doing it. I think everyone has their like and dislike. If we like something, we will initiate to do it. For my helper, I gave her free access to my kitchen and recipe books library. Never once she shows interest so after the first 2 years I gave up trying to coax her into cooking her traditional Philippine dishes. Now into her 4th year with us, she is used to have me serve her dinner. Well that's ok because I drag eating fried rice as that's the only staple dish she really know how to cook. On my busy day I try to make simple dinner. Sometimes I prepare in advance during day and helper put all into the pot or into the rice cooker for me in the evening. Yes, rice cooker dinner for all at home. Mom taught me this but again I twisted her recipe a little. This is one of the quickie dinners we love. 


Steamed Chicken Rice

Steamed Chicken

1 whole chicken, cut into pieces
4 cloves garlic, minced
1 tbsp minced ginger
4 tbsp oyster sauce
1 tbsp soy sauce
1 tbsp chinese cooking wine
2 tbsp sesame oil

Rice

5 pandan leaves, washed and tie In bundle
5 cloves garlic, crushed
4 slices ginger
1 tsp salt
2 cups uncooked rice
1 1/2 cup water


1. Mix chicken with garlic, ginger, oyster sauce, soy sauce, wine n sesame oil. 

2. Marinate for at least an hour or overnight or as long as time allows.

3. Washed rice, add water, pandan leaves, garlic, ginger, salt and mix well.

4. Place a steaming tray ( with holes) above the uncook rice mixture. Pour marinated chicken onto tray including all juices.

5. Cover rice cooker and let it cooked. Once cooked, do not open lid. Let everyone sit warmly inside cooker for another half hour.  

6. Take out chicken and arranged them onto a serving plate.

7. Removed pandan leaves, garlic and ginger from rice. Serve  rice with chicken.

I normally serve with some sesame oil and dark sauce dip. Ahhhhh I can smell the fragrance while typing out the recipe. Love this dish!!!!

Thursday, September 12, 2013

Terriyaki Chicken and Chawamushi (My way)

Japanese dinner!!!!! Knowing kiddos love Terriyaki....I know I made the right choice. Seeing their satisfying faces at dinner is my grestest reward after a tired day. Sometimes I am so tired, I start to day dream that I am a rich tai tai......go shopping, meet friends, do my readings, paintings, art, music and do not have to work and earning a living. Not kidding, I can really dream till I missed my exit in expressway back to home!!! I always have to say out loud to myself in the car, 'WAKE UP ADRIANA. FACE THE REALITY!!!!' what a pooper.... ok back to the earth. Now let's talk about making Terriyaki Chicken. 
Terriyaki Chicken

 2 pieces of chicken chops


Homemade Terriyaki Sauce

1/2 cup Japanese soy sauce
1/4 cup water
2 tbsp mirin
1 1/2 tbsp brown sugar
1 tbsp honey
1 1/2 tsp minced garlic
1 1/2 tsp minced ginger

Mix all ingredients in a small saucepan and boil till sugar dissolved. Let it cool.
(You can make the sauce in advance and store in fridge up to a week)

1. Once Terriyaki sauce has cooled, marinate chicken with the sauce for at least 1 hour or overnight.

2. Heat up a grill pan and oil the pan a little. Once pan is hot, grill the chicken till golden brown. 

Note: Do not turn the chicken too quickly. Be patient and let it sit On the grill for the tanning.
          Let the chicken sit for 5-10 mins before you cut them. This will retain the juice in the
          meat.


Chawamushi (My way) Serve about 4 bowls

2 eggs lightly beaten
250g mushroom stock (can get from supermart)
1/2 tsp Japanese soy sauce
4 shitake mushrooms
4 crab sticks


1. Mix beaten eggs and stock, gently beat till you see bubbles.

2. Place sliced Shitake mushroom and crab meat in a prepared bowls.

3. Sieve egg mixture into bowls to 3/4 filled.

4. Wrapped each bowl with foil and steam on high heat for about 12-15 mins. Serve hot.

I know my Chawamushi is not authentic but still, who cares??!!!! As long as my angels love it, I cook my own way.

Oishii!!!!

Tuesday, September 10, 2013

Fermented Tofu Chicken


Fermented tofu!!!! The thought of this makes me salivate!!!! Love the white ones for porridge and the red ones for cooking. Delicious with chicken, pork and vegetables. My kids love this particular dish. Fermented Tofu Chicken. It is such simple dish to make. You can even make more and store them in freezer. Use it when you have no ides what to cook.  This is a crowd pleaser :-)


Fermented Tofu Chicken

10 pieces of chicken drumsticks
3 Tbsp flour
Oil for deep frying

Marinate

2 pcs of Fermented tofu
1 tsp soy sauce
1tsp sesame oil
1/2 tsp sugar
Some chinese cooking wine
Pepper


1. Mix marinating ingredients In a Ziploc bag, pat dry drumsticks and add them into bag and mix well. Marinate it for at least an hour or overnight. The longer the better.

2. Heat up oil in a wok. Coat chicken in flour and fry them until golden brown and crispy. Drain and serve hot. 

3. I also serve with a dip using Fermented tofu juice mix with bit of sugar and hit it up. Let it cool and serve with the drumsticks.


Saturday, September 7, 2013

Fish and Onion Rings in Beer Batter

What is the best way to start my day??? Chaos!!!! Within me. No one at home really know whats going on most times.  I make sure i look calm on the surface til Lotte asked me, "mommy, why do you look like this today???" See, i am usually all doll up with makeup when I send kids to school. I am have look crappy. Woke up early but didn't want to get off bed and when my body decided to do so, i knew i am going to be late. My coffee, my routine regime getting myself presentable to face the day all gone down the flush....... so I started my day looking like a total wreck that has been trapped on an island for weeks.

Then went on my day working, running errands, fetching, working again then its close to dinner time!!!!! Gosh!!!! I forgot we all need to eat!!!! Maybe I should go to the garden at the corner of my block for some sweet green grass to stir fry . Ok stay calm Adriana. Not end of the world. Another let's see what we have in the fridge dinner...... hmmmm ok we have frozen fillet, we have a can of beer left 'cold' in the fridge for a long time. Great. Its 630pm, time to make magic!!!!!!! Dinner got to be ready by 715pm!!!!


Fish in Beer Batter

1 1/2 cup self raising flour
3/4 can of chilled beer
1 egg
2 tsp olive oil
Dash of black pepper
Some Basil leaves (i used dried ones)
1 tsp salt
2 pieces of frozen Sutchi fillet 


1. Whisk all ingredients together until smooth.
2. Cut the fillt into small bite piece. Add fish into batter and well coat.
3. While the fish swim in the batter, heat oil for deep frying in a wok.
4. Shaje off excess batter and fry fillet when oil is hot. Fry in medium high heat til golden brown.
4. Drain excess oil and serve with Tartar sauce.


Then i realised i have excess batter and right in front of me are some big yellow onions so i removed the skin and cut them out in rings. Dipped them into the left over batter and fry them till golden brown. Drained off excess oil and serve.

Conversation with Justin

"Mom, you know, I am happy."

"What makes you happy Justin?"

"Today, Casey hugged me."

"Wow, Why?"

"I gave her something..... Ahhhhh I am so in love"


This is my boy.  Gosh..... so young and he knows what is in love!!!  Am I suppose to be happy or worried???

Wednesday, September 4, 2013

Sinful Chewy Cookies

Friends who tried the cookies I made and asked for the recipe, here it is.  This is my Sinful Chewy Cookies, never fail to cheer little ones.  One is not enough for them.  I found this recipe long ago and made little adjustments.  So try making them friends!!!  


Sinful Chewy Cookies

1 egg, lightly beaten
1/2 cup brown sugar
75g butter, melted
1/3 cup self-raising flour, sifted
1 cup of plain flour, sifted
1/4 tsp bicarbonate of soda, sifted
1/3 cup Milo
1 pack of 110g M&M milk chocolate
1/2 cup baking chocolate chips


1. Beat egg and sugar in a bowl with an electric mixer for about 1 min, or until mixture is thick and pale.  Transfer to a large bowl.  Stir in melted butter, sifted flours, soda, Milo, M&M and chocolate chips. Fold all ingredients with a spatula. ( I prefer to use hands if you don't mind getting messy, trust me,it is easier to use hands)

2.  Preheat oven at 190 C for at least 10 mins.

3. Roll heaped tablespoons of mixture into balls, place 6 cm apart on baking sheet lined on baking tray. Flatten slightly with the back of a metal spoon.

4. Put tray on the middle rack and bake for 10 to 15 mins. Place on wire rack immediately to cool.


Note:  Make sure each cookie is about same size, this allows the cookies to cook evenly on the same tray.  You can use a weighing machine to measure same amount each time (Optional).  Once removed from oven, cookies will be soft when you press. Do not worry and don't place them back into oven! Cookies will set by itself once cool.  

Happy baking!!! :)


Teacher's Day - Survival Kit

 It is the supreme art of the teacher to awaken joy in creative expression and knowledge.
by Albert Einstein

I remember when I was young in primary school, there was this chinese teacher who to me is a MONSTER!!!!  He was scarily fierce and strict.  We were punished in the most infamous ridiculous ways..... he came up with many creative and out of the world punishments.  One of them was biting on to a metal spoon and stood on the table during recess.  We had to carry this metal spoon with us everyday to school on standby for punishment.  There were times when we forgot to bring, the first thing that came to mind was race to the canteen and begged the noodle stall sister to lend one to us and we promised to return once we were done with school.  So terrified of him!!! Those were the crazy days.   
 Looking back, it was such a pathetic and terrifying period for me and my classmates.  Teachers can have such big impact in our lives. Some good some bad.  

Justin's first special school teacher was amazing. Subsequently, he was blessed with many wonderful, caring, skillful teachers.  Without them, he would not be who he is now.  I am grateful.  Same for Charlotte, I have no issues with her teachers since she was in kindergarten.  I am relieve to say that my children are blessed.  


Every year I try to do little things for their teachers.This year I came up with something that need more effort.  A Teacher's Survival Kit!!!  Little inexpensive gift but requires alot of effort.  Got some containers and materials from Daiso and supermart. Content in the container were written on the blue paper in the picture on the right.


It was such a pleasant experience baking the cookies together. We had such great fun but my kitchen was gone.....hehehe..... was in a real mess but I am lucky to have a great helper who helped to clean up while I mess around with the kiddos.

We hope the teachers like our gift.

Tuesday, September 3, 2013

Good Fortune Chicken

Been eating too much pork and fish..... poor kiddos.  I feel bad they have to give their favourite chicken 'cold shoulder' on my expense.  So I decided to cook them chicken and I cook myself some beef for a change.  What is light and not too oily???? hmmmm..... brain cracked. Finally decided on this boiled chicken that is called Good Fortune Chicken.


Good Fortune Chicken

4 chicken thighs
4 tbsps chinese cooking wine
2 tbsps oil
1 spring onions, cut 
4 slices of ginger
2 cloves of garlic, sliced
2 tbsp wolfberries (gou qi zi), soaked

Seasoning
6 tbsps light soy sauce
3 tbsps sugar
2 tsp seasme oil 


1. Bring a pot of water to boil.  Add chicken once water boiled.  Poach chicken in boiling water for 15 mins or till cooked.  Drain well and rub chicken with chinese cooking wine. Cover and set aside in room temperature.

2. Heat oil in a wok over medium high fire. Stir fry ginger, garlic and wolfberries till fragrant, about 4 mins.  Add seasoning and mix well.  Lastly add spring onions and fry for a min and remove from fire.  

3. Cut chicken into bite size and arrange on a serving plate. Pour stir fried ingredients over the chicken and serve at once.


As for myself, I still have to stay off chicken and so this is my stir fry beef.


Stir-Fry Beef with Capsicum

A plate of sliced beef 
pinch of salt and pepper
1/2 tsp Thyme
1 clove of garlic, sliced
1/2 yellow onions, sliced
1/2 green capsicum, sliced 
1/2 red capsicum, sliced
1 tbsp light soy sauce
1 tbsp chinese cooking wine


1. Season the beef with salt, pepper and thyme.  

2. In a wok, heat 2 tbsp oil on high heat.  Add Onions and stir fry for 1 min then ass garlic and fry for another 1 min.
  
3. Once fragrant, add beef and capsicums (I like my capsicum a little raw so I add last.  You can add capsicum before beef if you like them more cooked)

4. Fry for 1/2 min and add seasoning.  Stir well and serve hot with rice.